What Is an Apple Corer? Uses, Types & Benefits
What Is an Apple Corer? It’s a handheld fruit prep tool that removes the core, seeds, and stem from an apple in one motion. Most versions look like a short tube with a sharp lower edge and a handle on top.
That simple shape is why it’s so easy to recognize once you see it.
Common tube diameters run about 3/4 to 1 inch, or 19 to 25 mm. That size fits around a typical core without wasting much flesh. Manufacturer specs also show lengths around 7 to 9 inches, which gives enough leverage for firm apples.
Once you can picture those parts, the rest becomes much easier.
Quick Answer: What an Apple Corer Is
What Is an Apple Corer? It is a small handheld fruit corer tool for everyday home kitchens. It removes the core, seeds, and tough stem from whole apples.
Most basic models use a hollow steel tube pressed through the fruit.
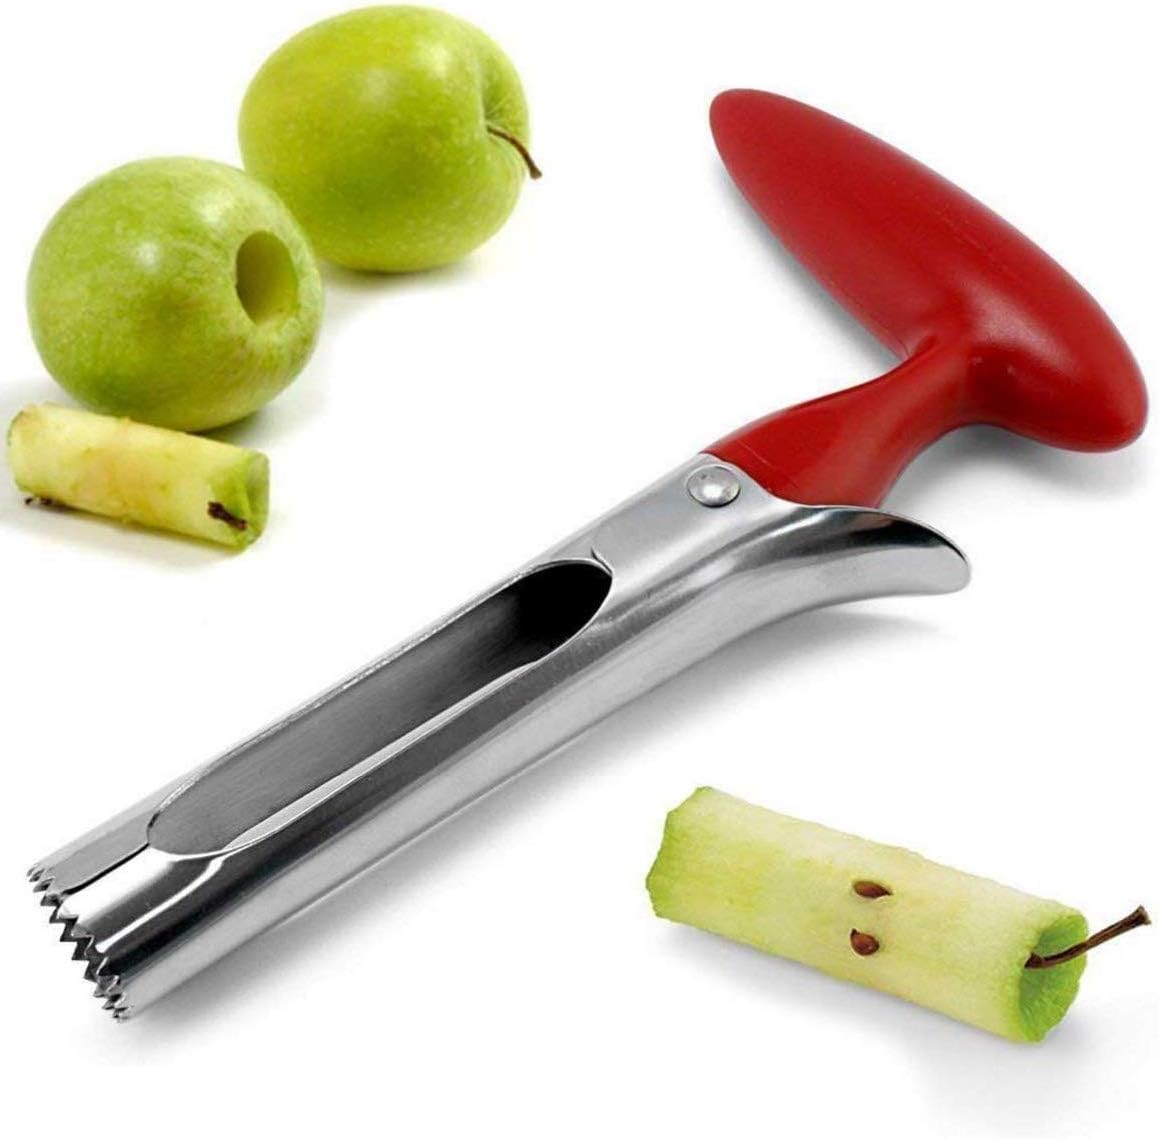
Image source: Bing (Web (fair-use with source credit))
Why an Apple Corer Is Easier to Understand Visually
You can describe an apple corer in one sentence, but the shape explains it faster. The tool is basically a short metal tube with a handle. The lower edge does the cutting.
The hollow center holds the removed core.
A photo or diagram makes three things obvious right away. First, the cutting rim is narrower than the apple. Second, the tube must be hollow.
Third, the handle sits above the cutting edge so you can push straight down.
This is why visual cues matter more than definitions. If you only read the words “fruit corer,” you might picture a pitter, a small knife, or a slicer. A single image removes that confusion.
It shows the tube shape, the open channel, and the straight pressing motion.
For readers who learn by watching, the key visual signals are:
- A hollow cylindrical cutting tube
- A sharp lower rim or serrated edge
- A handle placed directly above the tube
- A side slot or open frame for core release
In our research, the most useful product images show the tool next to an apple. That gives instant scale. You can see how wide the tube is and how much fruit it will remove.
The Main Parts You’ll See on a Tube-Style Apple Corer
A tube-style apple corer has only a few parts, but each one affects how cleanly it works. The handle gives you control. The shaft keeps the tool aligned.
The cutting rim does the actual work.
The core channel carries the waste out of the apple. Most basic handheld corers are made from stainless steel. As of 2026, manufacturer specifications often list 18/8 stainless steel for the tube and handle.
| Part | What to look for | Why it matters |
|---|---|---|
| Handle | Comfortable grip and solid attachment | Helps you press without slipping |
| Shaft | Straight, sturdy metal tube | Keeps the corer aligned through the apple |
| Cutting rim | Sharp or serrated lower edge | Cuts skin and flesh cleanly |
| Core channel | Hollow tube with enough width | Holds the core for removal |
| Ejection slot | Side opening or open frame | Makes core release faster and easier |
That matters because kitchen tools need rust resistance and safe repeated food contact. For food-contact materials, the U.S. Food and Drug Administration sets broad safety expectations for items that touch food regularly.
Some models add a soft grip or a wider loop handle.
Those details are easy to spot in photos. They also matter more if you prep a lot of apples or have less hand strength.
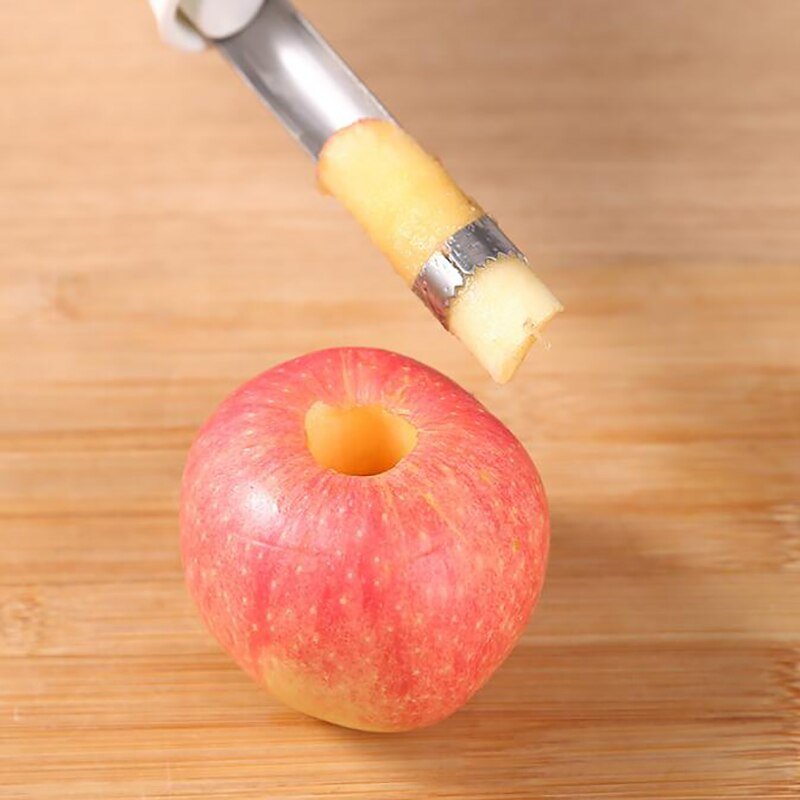
Image source: Bing (Web (fair-use with source credit))
How an Apple Corer Works in One Clean Motion
An apple corer works by cutting a cylinder around the core. You place the tool over the stem end. You push down while twisting slightly.
The sharp rim cuts through the flesh, and the hollow tube captures the core inside.
The motion is simple, but the geometry is doing the work. The tube diameter is wide enough to surround the seeds and tough center. It is still narrow enough to leave most of the edible flesh behind.
That is the main advantage over using a knife.
A good coring action usually has three phases.
| Phase | What happens | Visual cue |
|---|---|---|
| Placement | The rim sits over the stem | The tool stands straight on the apple |
| Cutting | The edge sinks into the flesh | You feel steady resistance, not crushing |
| Removal | The core lifts out inside the tube | The apple keeps its round shape |
If the apple stays whole, the corer did its job. That matters for baked apples, apple rings, and presentation slices. If the apple collapses or tears, the tool may be dull, too narrow, or poorly centered.
Firm apples show this best. Varieties like Granny Smith, Honeycrisp, and Fuji hold their shape. Softer apples can bruise or split, especially if the cutting edge is not sharp.
Aggregate user reviews often mention that a slight twist makes the cut cleaner on very firm fruit.
How to Use an Apple Corer: Visual Step-by-Step
Using an apple corer is fast, but the setup matters. You want a stable surface, a centered starting point, and a straight downward path. The whole process usually takes about 5 to 15 seconds per apple.
Here is the basic workflow.
- Rinse the apple and dry the skin.
- Place it stem side up on a cutting board.
- Center the corer over the stem.
- Press down while twisting gently.
- Pull the corer straight out.
- Eject the core through the side slot or open frame.
- Check the center for leftover seeds.
Centering the Corer Over the Stem
Centering is the step most people rush, and it is the step that matters most. Place the cutting rim directly over the stem. Keep the tool vertical.
If the corer leans, the core may stay partly inside the apple.
A good visual check is simple. The handle should sit straight above the apple, not tilted toward one side. The rim should touch the skin evenly around the stem.
That even contact helps the edge bite cleanly.
If the apple is large, you may need a slightly wider corer. If the apple is small, a narrower tube gives better control. This is where size specs matter.
A 3/4-inch tube suits smaller apples.
A 1-inch tube often works better for large baking apples.
Pressing, Twisting, and Ejecting the Core
Press down with steady pressure while adding a small twist. Do not force it sideways. The twist helps the cutting rim move through the skin and flesh.
Stop when the corer reaches the base of the apple.
Then pull the tool straight up. The core should remain inside the hollow tube. If it sticks, use the ejection slot or push it out from the top if the design allows.
Rinse the corer right away.
Dried apple pulp is harder to remove later. A quick visual check tells you if the cut was clean. The apple should look round and intact.
The removed core should hold together in a neat cylinder.
If seeds remain, run a small knife tip through the center or re-core with a slightly better centered pass.
Key Visual Identifiers of a Good Apple Corer
A good apple corer looks simple, but small design details show up fast in photos. Start with the tube. It should be straight, smooth, and evenly round.
The cutting rim should look clean and defined. A dull edge often appears rounded or flattened. A sharp rim catches light along a thin line.
| Visual clue | What it tells you |
|---|---|
| Straight hollow tube | The corer will stay aligned through the apple |
| Sharp lower rim | It will cut skin cleanly instead of crushing it |
| Centered handle | You can press down with better control |
| Open side slot | The core releases faster and with less mess |
| Smooth metal finish | Food residue is less likely to cling to the surface |
Handle alignment matters just as much as sharpness. If the handle sits off center, the tool can drift as you press. That leads to crooked cores and wasted fruit.
Material finish is another easy visual check. Brushed stainless steel usually hides light scratches. Polished steel shows smudges more, but it is still easy to clean.
A good product photo should also show scale. Look for the corer next to an apple or a hand. That helps you judge tube width and handle size before you buy.
Common Visual Mistakes When Coring Apples
Most coring problems are visible before the tool even cuts. The most common mistake is placing the corer off center. That leaves seeds behind and can split one side of the apple.
Another common issue is angle. If the handle tilts to one side, the tube will cut a crooked path. The apple may look damaged from the outside.
What does a poorly cored apple look like?
A poorly cored apple usually has a crooked hole, torn flesh, or seeds left near the center. The shape may look lopsided after slicing. You may also see bruising where too much pressure was used.
What tells you the corer is too dull?
A dull corer often crushes the skin instead of cutting it. The top of the apple may look mashed or ragged. The removed core may break apart instead of holding its shape.
Aggregate user reviews often mention two more visual mistakes. The first is stopping too soon. If the tube does not reach the base, the bottom of the core stays inside.
The second is twisting too hard. A small twist helps. A hard twist can tear the flesh and make the apple look ragged.
If the apple is very soft, the mistake may be the fruit choice. Soft apples bruise easily and do not give clean visual feedback. Firm apples show proper technique much better.
Handheld Corer vs. Crank Peeler-Corer-Slicer
A handheld corer is best for quick jobs and whole apple prep. A crank peeler-corer-slicer is best for large batches and uniform slices.
The handheld version is the tool most people picture first. It has one tube, one handle, and no setup parts. It works well for a few apples at a time.
The crank machine looks very different. It usually has a suction base, a turning handle, and blades that peel, core, and slice in one pass. It takes more space, but it speeds up high-volume prep.
| Factor | Handheld corer | Crank peeler-corer-slicer |
|---|---|---|
| Best for | Quick coring, whole apples, small batches | Pies, canning, large batches |
| Setup | None | Needs mounting and alignment |
| Output | Whole cored apples | Peeled, cored, sliced spirals |
| Storage | Very small | Takes drawer or cabinet space |
| Typical price | About $5 to $20 | About $25 to $60 |
The visual difference is just as important as the price difference. A handheld corer leaves the apple whole. A crank machine usually turns the apple into a spiral slice.
That changes the end use. If you want baked apples, the handheld tool is usually better. If you want fast pie filling, the crank machine often wins.
Hand strength matters too. A handheld corer needs a firm downward push. A crank machine reduces that effort but adds setup time.
Best Use Cases: Baking, Apple Rings, Snacks, and Canning Prep
This tool shines when the apple needs to stay whole or look neat. That makes it especially useful for baked apples, stuffed apples, and apple rings.
For baking, the goal is a clean center cavity. You want the core gone without blowing out the sides. A tube corer does that better than a knife in most home kitchens.
Apple rings are another strong use case. Once the core is removed, you can slice the apple into even rounds. That matters for presentation, snacks, and dehydrating.
| Use case | Best result | Why it works |
|---|---|---|
| Baked apples | Whole fruit with clean center | Holds filling better |
| Apple rings | Neat round slices | Great for snacks and drying |
| Lunch prep | Faster portioning | Less knife work |
| Canning prep | Higher volume | Speeds up repetitive coring |
Snack prep is where convenience really shows. A parent or meal prepper can core several apples quickly. The fruit still looks natural, not machine cut.
Canning and preserving work a little differently. You often need speed more than perfect presentation. For very large batches, a crank machine may overtake the handheld tool.
Apple variety affects the result. Firm types like Granny Smith, Honeycrisp, and Fuji hold shape well. Large cooking apples like Bramley may need a wider tube.
If the apple is small, a narrow corer gives cleaner control. If the apple is wide, a wider tube removes the core more completely. That one size match makes a visible difference.
Specs, Sizes, and Pricing to Look For
Specs matter more than brand claims. The tube diameter is the first number to check. It decides how much of the core comes out in one pass.
Most handheld corers fall between 3/4 and 1 inch, or 19 to 25 mm. Smaller tubes waste less flesh. Wider tubes handle large apples more reliably.
Overall length usually runs about 7 to 9 inches. That gives enough leverage without making the tool awkward in a drawer. Weight often sits between 2 and 6 ounces.
| Spec | Common range | What to watch |
|---|---|---|
| Tube diameter | 3/4 to 1 inch | Too narrow may leave seeds |
| Overall length | 7 to 9 inches | Too short can reduce control |
| Weight | 2 to 6 ounces | Very light tools may feel flimsy |
| Material | Stainless steel | Better rust resistance than plain carbon steel |
| Handheld price | $5 to $20 | Cheap handles can crack |
| Crank machine price | $25 to $60 | Needs more storage space |
Material choice affects both safety and lifespan. Stainless steel resists rust and handles frequent washing well. Manufacturer specs often list 18/8 stainless steel for better models.
Handle design also affects value. Soft grip plastic can feel more comfortable. Full metal construction often lasts longer.
If the tool will be used in a food business, sanitation standards matter more. In that case, look for equipment standards from NSF International. For home use, simple food grade material and easy cleaning are usually enough.
Pricing follows build quality more than feature count. A basic stainless steel corer can outlast a cheaper novelty model. The best value is usually a sturdy tube, a sharp rim, and a handle that stays tight over time.
Safety and Cleaning Practices
Keep fingers away from the lower rim. The cutting edge can slip on waxy skin, so press on a stable board, not in your hand.
Wash the corer before first use. If the manufacturer lists dishwasher safe cleaning, use the top rack. Otherwise hand wash it.
Dry the tube immediately to prevent water spots and rust.
Maintenance: Keeping the Edge Sharp and Rust-Free
Rinse the corer right after use. Apple pulp dries fast and can stick inside narrow tubes.
Use a small bottle brush for the channel. If rust appears, scrub it off, dry fully, and apply a light food grade mineral oil coat. Replace the corer if the rim becomes dull, bent, or loose.
Quick Storage and Longevity Checklist
Store the corer fully dry. Hang it by the loop if the handle has one. Keep the cutting edge covered in a drawer.
Do not toss it loose with knives. Check the handle for looseness before heavy prep.
FAQs
Can an apple corer remove pear cores too?
Yes, an apple corer can remove pear cores if the fruit is firm. Soft pears may bruise. Center the tube over the stem and press gently.
A narrower tube helps small pears. Check the center again for seeds before slicing.
Is an apple corer dishwasher safe?
Many stainless steel apple corers are dishwasher safe, but care instructions vary. Plastic soft grip handles may crack under high heat. Hand washing protects the edge better.
Rinse pulp immediately, wash with warm soapy water, and dry fully. This reduces rust.
What can I use if I do not have an apple corer?
A small paring knife is the best substitute. Cut around the core in a shallow circle, then lift it out. A melon baller can scoop seeds from halved apples.
For rings, slice the apple and cut centers with a small cutter.
Do apple corers waste a lot of fruit?
A good apple corer removes only the core and a thin ring of flesh. Tube diameters around 3/4 to 1 inch help limit waste. A dull or poorly centered corer removes more fruit.
Firm apples usually give the cleanest result.
Final Verdict: When an Apple Corer Is Worth Buying
Buy a handheld apple corer if you want whole cored apples, baked apples, or neat rings. It is cheap, small, and fast for low volume prep.
Skip it if you only need chopped apples for sauce. For large pie batches, a crank peeler corer slicer usually saves more time. Choose stainless steel, a sharp rim, and a secure handle.