Cherry Pitter Safety Tips to Avoid Messes and Injuries
Cherry Pitter Safety Tips matter most when your fingers sit too close to the plunger. A pitter can be safer than a knife, but it still has pinch points. Most injuries come from slipping, jamming, or rushing a large batch.
As of 2026, most manual cherry pitters handle fruit about 14 to 28 mm across. Food-contact parts should meet FDA food-contact material rules in the U.S. or equivalent standards elsewhere. The goal is simple.
Keep the tool stable and your hands out of the blade path. That brings us to why this deserves real attention.
Cherry Pitter Safety Tips to Avoid Messes and Injuries

Image source: Bing (Web (fair-use with source credit))
Why Cherry Pitter Safety Needs Real Attention
A cherry pitter reduces knife slips, but it is not risk free. The tool concentrates force into a small metal path. Your fingers often sit close to that path.
Most problems happen for predictable reasons. The base slips. The cherry rolls.
The handle snaps back. A jam tempts you to reach in.
Aggregate reviews report the same few injuries. People mention pinched fingers. Some report juice in the eyes.
Others cut themselves while cleaning small parts.
Product safety notices from the U.S. Consumer Product Safety Commission usually focus on unstable tools, exposed blades, and poor guards. That matches what we see in user feedback.
The risk rises sharply during large batches.
Fatigue matters. After 100 cherries, your grip gets sloppy. You press harder.
You stop using the guard. That is when accidents cluster.
Food contact matters too. Materials that touch fruit should meet FDA food-contact rules in the U.S. or equivalent standards elsewhere. This affects safety during cleaning and long term wear.
Quick Answer
Cherry Pitter Safety Tips keep fingers clear of the plunger path. Lock or brace the base before pitting. Use the finger guard and splash shield.
Press smoothly and never force a stuck jam. Always unplug electric pitters before cleaning or unjamming.
How Cherry Pitters Actually Work and Where Injuries Happen
A cherry pitter works by pushing a rod or blade through the fruit while the pit exits through a lower opening. The fruit sits in a seat. Your hand controls the plunger or lever.
The safe zone is outside the moving path. The danger zone is anywhere the plunger, hinge, or spring can pinch skin. A diagram would show three pinch points.
Those are the fruit seat, the hinge, and the pit exit.

Image source: Bing (Web (fair-use with source credit))
Manual Handheld Pitters
Handheld pitters look like pliers. You squeeze the handles, and a plunger drives the pit out. The main risk is finger placement.
Keep your thumb away from the hinge. Keep the fruit-holding fingers clear of the plunger tip. If the cherry is small, do not push it with a fingertip.
Use the tool seat.
These models often lack a large guard. That makes control more important. Work over a bowl.
Keep the pit direction pointed away from your face.
Countertop and Lever-Action Pitters
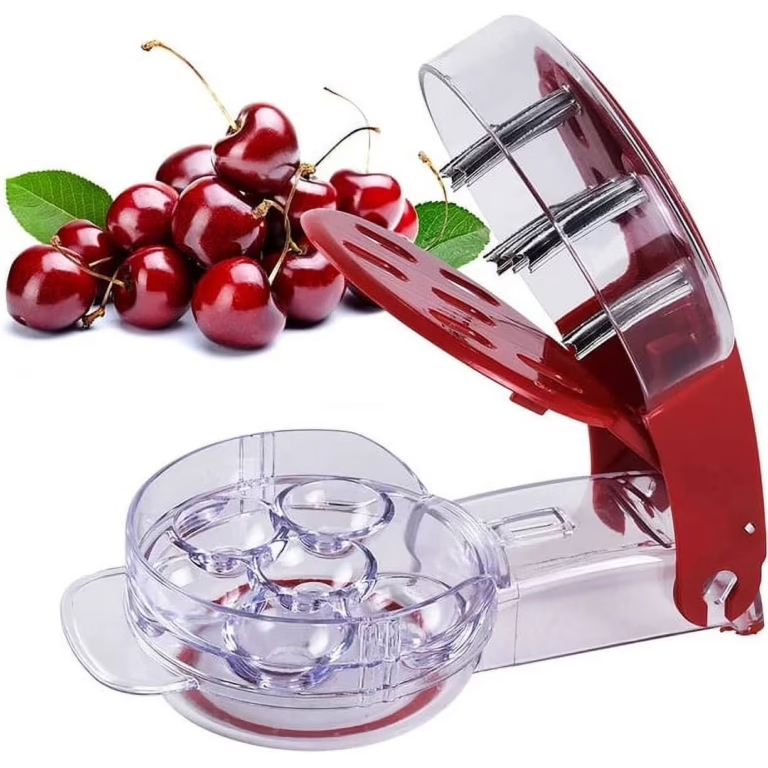
Countertop models use suction or a clamp. A lever pushes the pit downward. They usually offer better stability than handheld tools.
The risk shifts to setup. If the suction base is wet, it can slide. If the lever returns fast, it can pinch.
Keep hands off the lever path during release.
These units often eject pits sideways or backward. Check the ejection path before you start. Do not place your palm under the fruit tray.
Electric Cherry Pitters
Electric models feed cherries through a mechanism with less hand pressure. They can be faster for big batches. They also add electrical and mechanical risks.
Manufacturer specifications indicate most electric pitters need unplugged cleaning. Never put fingers near the feed chute while power is connected. Unplug the unit before clearing jams.
Follow the manufacturer manual for blade access.
If the unit starts unexpectedly, stop. Do not use it until the switch and cord are checked. Moisture and electricity do not mix.
Key Safety Features to Check Before You Buy or Use One
Good safety features reduce user error. They do not replace careful hands. Still, they make accidents less likely.
Use this table before you buy or use a pitter.
| Feature | Why it helps | Quick check |
|---|---|---|
| Stable suction base | Stops sliding under pressure | Press down and try to move it |
| Finger guard | Keeps fingers out of the plunger path | Check that it covers the moving rod |
| Splash shield | Blocks juice and pit fragments | Make sure it locks or snaps in |
| Locking latch | Prevents accidental closure | The handle should lock closed |
| Smooth spring | Reduces snap back | Release slowly and watch the path |
| Removable parts | Makes cleaning safer | Parts should separate without forcing |
| Food-safe materials | Prevents unsafe food contact | Look for food-grade steel and BPA-free plastic |
A few extra checks matter just as much.
- Inspect the tool before every session.
- Look for cracks, loose hinges, rust, or bent parts.
- Check that the plunger moves straight.
- Make sure the pit catcher or tray sits firmly.
- If parts wobble, stop using the tool.
If the base will not hold, do not use it. If the guard is missing, replace the tool or the part. A cheap pitter should not cost you a trip to urgent care.
Step-by-Step Safe Pitting Process for Manual and Countertop Models
Before You Start
- Inspect the pitter. Look for cracks, rust, loose hinges, or bent parts.
- Wash and stem the cherries. Remove leaves and damaged fruit.
- Dry the counter. Wet counters defeat suction bases.
- Secure the tool. Lock the clamp or press the suction base firmly.
- Set a bowl under the pit exit. This catches juice and pits.
Sort fruit by size when you can. Oversized cherries jam more often. Undersized cherries can slip and crush.
If a cherry does not fit, do not force it.
While Pitting
- Place one cherry in the seat. Align it with the plunger.
- Keep your free hand outside the guard. Do not hold the cherry with your fingertips.
- Press smoothly. Let the tool do the work.
- If resistance spikes, stop. Release pressure and clear the jam.
- Watch pit direction. Keep your face out of the exit path.
Work at a steady pace. Speed comes from setup, not force. If juice sprays, adjust the shield or bowl position.
If the tool slips, stop and reset the base.
Safety note: Never put a finger into the fruit seat while the tool is under tension.
After Use
- Release tension before disassembly. For electric models, unplug first.
- Empty pits into waste. Do not reach into the chute.
- Wash food-contact parts. Dry metal parts fully.
- Store locked or out of reach. Keep blades covered if possible.
Cleaning is where many cuts happen. Small parts hide sharp edges. Use a brush for tight spaces.
If a part is hard to reach, take your time.
Electric Cherry Pitter Safety: Extra Precautions
Electric cherry pitters reduce hand force, but they add motor and cord risks. Treat them like any small kitchen machine. Unplug the unit before cleaning, unjamming, or adjusting any part.
Keep the cord away from water, sinks, and hot surfaces. Do not let it hang where a child can pull it. If the cord looks frayed, stop using the pitter.
Use the feed chute only with the provided pusher. Never use a fork, knife, or finger to move fruit near the mechanism. Manufacturer manuals usually warn against this exact point.
If the motor stalls, turn the unit off and unplug it. Then remove the fruit. Restart only after the path is clear.
Check the voltage if you buy across markets. U.S. models expect 110 to 120 volts. UK and EU models expect 220 to 240 volts.
A converter may not be safe for motor loads.
What if it gets wet?
Unplug it first if any liquid reaches the motor base. Wipe the base with a damp cloth only. Do not rinse the motor housing under a faucet.
Common Cherry Pitter Mistakes That Cause Cuts, Pinches, or Messes
Most injuries come from predictable habits. Fixing them early prevents most harm.
| Mistake | What goes wrong | Safer fix |
|---|---|---|
| Holding the cherry with fingertips | Fingertips enter the plunger path | Let the fruit seat hold the cherry |
| Ignoring a sliding base | Tool moves and pinches skin | Reset the suction on a dry counter |
| Forcing oversized fruit | Jam and sudden slip | Sort cherries or switch tools |
| Reaching into a jam | Finger contacts blade or rod | Release tension and unplug first |
| Removing the guard | Splash and pit fragments hit skin | Keep the shield in place |
| Cleaning while assembled | Hidden edges cut fingers | Disassemble only as allowed |
Speed is not the enemy. Loss of control is. Work at a pace where every cherry is seated.
If juice sprays, stop and adjust the bowl or shield. If pits fly, change the ejection direction. Small changes fix most messes.
When a Cherry Pitter Is Not the Right Tool
Sometimes the safest choice is not to use the pitter at all. If the tool is cracked, loose, or rusty, stop. Replace it or repair it with approved parts.
If you have only a few cherries, a small knife may be faster. It still needs care, but it avoids setup and cleaning. For cooked jams, a food mill can remove pits after heating.
Use this simple guide.
- If the batch is under one pound, a knife or straw method may be enough.
- If the batch is several pounds, a stable countertop pitter is safer.
- If the batch is frequent and large, an electric model may reduce strain.
- If the fruit is frozen, bruised, or very soft, expect jams and poor results.
- If pits must stay whole for presentation, a pitter may damage the fruit.
Oversized cherries are a common limit. Many home pitters handle fruit up to about 28 mm across. Larger fruit may not seat well.
If the tool needs force, it is telling you no.
For commercial volume, a dedicated depitter is safer than pushing a home tool past its rating. Home units are not built for continuous daily abuse.
Cleaning, Maintenance, and Storage Without Cutting Yourself
Cleaning is where many small cuts happen. The parts are small, wet, and sharp. Slow down.
Unplug electric units first. Then disassemble removable parts according to the manual. Use a small brush for the fruit seat and chute.
Do not scrub blind openings with a fingertip.
Wash food-contact parts in warm soapy water. Rinse and dry metal parts fully. Moisture left on steel can cause rust.
If the manufacturer allows dishwasher cleaning, use the top rack. If it does not, hand wash only. Never soak a motor base.
Check wear during cleaning.
- Look for bent plungers.
- Look for cracked plastic.
- Look for loose hinges.
- Look for dull or chipped edges.
Store the pitter locked or latched. Keep it out of reach of children. If the unit has a blade cover, use it.
For metal parts, a light food-safe oil can help prevent corrosion when the manual allows it.
Who Needs Extra Caution: Kids, Seniors, Arthritis, and High-Volume Prep
Some users face higher risk. The tool choice and pace matter more for them.
Children should not operate a cherry pitter. Pits are also a choking hazard. If older kids help, use a stable manual model, keep hands visible, and supervise closely.
Seniors and users with arthritis may struggle with handheld squeeze tools. A countertop lever or electric pitter can reduce grip strain. Look for a large handle and a low-force spring.
High-volume prep brings fatigue. Aggregate reviews report more pinches during long sessions. Take a short break every 10 to 15 minutes.
Alternate tasks. Empty pits before the tray overflows.
For reduced hand strength, stability matters more than speed. Use a non-slip mat under the tool. Sit at counter height.
Keep bowls close so you do not reach over moving parts.
If pain, numbness, or tingling starts, stop. Kitchen prep can wait. Prolonged hand strain is not worth a batch of jam.
Cost vs Safety: What You Get from Cheap, Mid-Range, and Premium Pitters
Price affects stability more than almost anything else. Cheap pitters often use thin plastic and weak suction. Those parts can flex, slip, or crack under pressure.
| Tier | Typical price as of 2026 | Safety tradeoffs |
|---|---|---|
| Cheap handheld | $8 to $15 | Small guards, weak hinges, poor base stability |
| Mid-range manual or countertop | $20 to $45 | Better suction, stronger levers, more consistent fruit seating |
| Premium manual or electric | $50 to $150 | Sturdier frames, better shields, easier cleaning, lower strain |
Do not buy on price alone. A $12 pitter that slides can be riskier than a $35 model that stays put. If you pit often, spend on stability and cleanability.
For occasional use, a solid mid-range manual pitter is usually enough. For large batches, a premium countertop or electric unit may reduce fatigue. If you have arthritis or weak grip, the higher cost can buy real safety.
What specs matter most?
Look for a stable base first. Then check guard coverage and blade alignment. A smooth spring return matters more than flashy design.
Food-grade stainless steel parts are worth seeking. They resist rust and hold up better during cleaning. BPA-free plastic is fine for non-stress parts, but hinges take abuse.
FAQs About Cherry Pitter Safety
Are cherry pitters safer than knives?
They usually are for repeated pitting. A pitter keeps the cutting path contained and reduces knife slips. The risk shifts to pinch points and jams.
Keep fingers out of the plunger path. Use the guard. If the tool is loose or cracked, a knife used carefully may be safer.
Can children use a cherry pitter?
Young children should not use one. The tool has pinch points, and pits are a choking hazard. Older kids may help only with close supervision.
Use a stable manual model. Keep hands visible. Let the fruit seat hold the cherry, not fingertips.
Why does my cherry pitter crush the fruit?
It usually means the cherry is too soft, too large, or poorly aligned. Frozen or bruised fruit also crushes easily. Stop if you feel resistance.
Seat the cherry again or sort by size. For very soft fruit, a food mill after cooking may work better.
How do I clean a cherry pitter without cutting myself?
The safest method is to unplug the tool and disassemble only as allowed. Use a small brush for the fruit seat and chute. Wash parts in warm soapy water.
Dry metal pieces fully. Never push fingers into tight openings. Store the tool locked or covered.
Do electric cherry pitters need special safety steps?
Yes, electric units need extra steps because motors and cords add risk. Always unplug the unit before cleaning or clearing a jam. Use the pusher, not your fingers.
Keep the cord dry and away from sinks. If the motor stalls, turn it off and unplug it before removing fruit. Check voltage before use.
Can a cherry pitter pit olives safely?
Yes, if the tool is rated for olives and fruit size fits. Olives can be firmer or slippery, so base stability matters. Keep fingers clear and use the guard.
Clean well after use, especially if the same tool handles cherries and olives.
Final Safety Checklist Before You Start Pitting
If any check fails, pause. A broken pitter is not worth the risk. Replace the part or choose another method.
- Inspect the pitter for cracks, rust, loose hinges, and bent parts.
- Dry the counter and secure the suction base or clamp.
- Set a bowl under the pit exit before you start.
- Keep the finger guard and splash shield in place.
- Seat each cherry fully before pressing.
- Keep your free hand outside the plunger path.
- Stop and release tension if the tool jams.
- Unplug electric models before cleaning or unjamming.
- Wash and dry food contact parts fully.
- Store the pitter locked and out of reach of children.