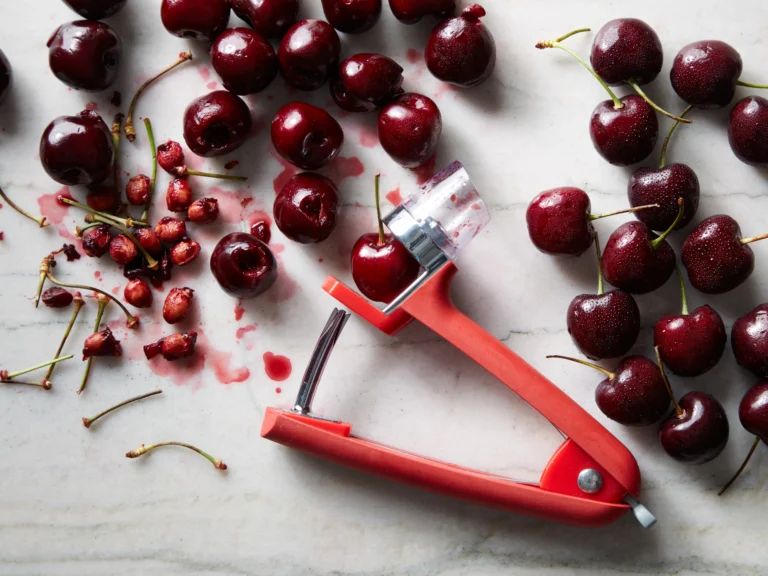
Cherry Pitter Hard to Clean? Easy Fixes That Work
A Cherry Pitter Hard to Clean problem usually starts with one thing. Cherry pulp dries fast. It glues springs, hinges, and pit channels together.
That is why a quick rinse matters more than a long soak.
Most pitters have tight food-contact crevices where fruit sugar hardens. Normal dishwasher cycles can reach about 55°C to 65°C, which helps sanitation but can speed rust on plated metal. So the right path depends on the pitter material and how long the residue has sat.
Let's sort that out.
Cherry Pitter Hard to Clean? Easy Fixes That Work

Image source: Bing (Web (fair-use with source credit))
Quick Answer
A Cherry Pitter Hard to Clean is usually fixable. Rinse it right after use. Take apart removable pieces.
Brush the pit channel well. Dry fully and check for rust.
Why Cherry Pitters Get So Hard to Clean
Cherry pitters are small tools with a big cleaning problem. They handle juicy fruit, sticky sugar, and hard pits in one motion. Then residue gets pushed into places you cannot easily see.
The worst spots are usually the same.
- The plunger shaft
- The spring
- The hinge pin
- The pit discharge slot
- Screw joints on lever models
Cherry sugar is sticky, and it hardens in the small spaces that a sponge cannot reach. If the pitter sits in a drawer or dish rack overnight, that residue turns into glue.
Material matters too. Stainless steel usually resists rust better than chrome-plated metal or zinc alloy. Plastic bodies stain easily but may avoid corrosion.
The cleaning method should match the material.
Quick Answer: Rinse, Disassemble, Brush, and Dry It Properly
The fastest fix is a simple workflow. Do not start with a long soak. Start with the easiest step that removes fresh residue.
Use this order.
- Rinse the pitter under warm running water.
- Remove any loose pits.
- Separate removable parts if the design allows it.
- Brush the pit channel, hinge, and spring area.
- Rinse again and inspect for pulp.
- Dry fully before storage.
If the pitter was left dirty for hours, move to a deep-clean path. If you see rust, stop and inspect the metal before scrubbing. Rust changes the decision.
Check These Conditions Before You Start Cleaning
The right cleaning path depends on a few conditions. Check these first.
| Condition | What it means | Best next step |
|---|---|---|
| Fresh residue | Used within the last few minutes | Rinse and brush right away |
| Dried pulp | Sticky or hard residue | Warm soaky soak, then brush |
| Stuck pit | Pit fragment jammed in chute | Remove gently with a wooden pick |
| Rust spots | Metal corrosion, often at hinge | Inspect, clean lightly, consider replacing |
| Plastic staining | Cherry pigment in plastic | Baking soda paste, gentle scrub |
| Mineral film | Hard-water buildup | Short vinegar soak, rinse well |
If the pitter is dishwasher safe, that can help with sanitation. If it is plated metal or has exposed screws, hand washing is often safer.
Safety Checks Before Disassembling or Scrubbing
Small kitchen tools can cause cuts and contamination if handled carelessly. Cherry pitters have sharp internal edges and small parts that can fly loose.
Before cleaning, do these checks.
- Empty pits from the chamber first.
- Work over a sink or towel so small parts do not bounce away.
- Keep springs and pins away from children.
- Do not soak sharp parts in a full sink where you cannot see them.
- Avoid steel wool on food-contact surfaces.
Manufacturer care labels matter. The U.S. Food and Drug Administration publishes guidance on keeping food-contact surfaces clean and safe.
That matters most when the pitter is used for large batches, preserving, or any food that will be stored.
If rust is present on a surface that touches fruit, treat that as a warning. Light surface rust may be removable. Deep or returning rust is a replacement signal.
Routine Cleaning Path for a Freshly Used Cherry Pitter
This is the easiest path. It also prevents most future problems.

Image source: Bing (Web (fair-use with source credit))
Clean a freshly used pitter in this order.
- Rinse under warm water immediately.
- Open and close the pitter several times under the water.
- Remove any visible pits or skin.
- Use a small brush on the pit channel.
- Wash with warm soapy water.
- Rinse well.
- Dry with a towel, then air-dry fully.
A detail brush works better than a sponge. It can reach the narrow channel where pulp collects. If your pitter has a removable plunger, take it out and clean the shaft separately.
Do not put the pitter away damp. Moisture left in hinges or springs is where rust and odors start.
Deep-Cleaning Path for Dried Pulp, Stuck Pits, or Sticky Springs
If the pitter sat overnight, do not force the mechanism. Dried pulp can make the plunger stick, and forcing it can bend small parts.
Use this path.
- Fill a bowl with comfortably hot tap water.
- Add a little dish soap.
- Soak the pitter for 10 to 20 minutes.
- Work the plunger gently under water.
- Brush the hinge, spring, and chute.
- Use a wooden pick for stuck pulp.
- Rinse and inspect.
- Repeat if residue remains.
For sticky springs, a soft brush works best. A toothbrush can reach around coils. Avoid metal picks on plastic parts because scratches can trap food later.
If the pitter has screws, check whether they can be removed. Some models allow partial disassembly. Others do not.
If parts come apart, lay them on a towel so nothing rolls away.
Rust, Cherry Stains, Odors, and Mineral Buildup: What to Do
Different problems need different fixes. A rust spot is not the same as a cherry stain.
| Problem | Likely cause | Safe fix |
|---|---|---|
| Rust | Moisture, plated metal, dishwasher use | Light scrub, dry fully, replace if deep |
| Red stains | Cherry pigment in plastic | Baking soda paste, gentle scrub |
| Sour odor | Trapped pulp or mold | Deep clean, dry fully, inspect hinges |
| White film | Hard-water minerals | Short vinegar soak, rinse well |
| Stiff action | Dried sugar or corrosion | Warm soak, brush, dry, oil if suitable |
For mineral deposits, use a 1:1 vinegar and water soak. Keep it short. Rinse well afterward.
For cherry stains, make a thick paste of baking soda and water. Let it sit for a few minutes, then scrub gently. Stains on plastic may not vanish fully, but they are usually harmless if the surface is clean.
For odors, the issue is often hidden pulp. Check the hinge and spring area closely. If mold appears in seams and cannot be removed, replace the pitter.
Cleaning Path by Cherry Pitter Type
Not all cherry pitters clean the same way. The design changes where residue hides.
| Pitter type | Main cleaning issue | Best approach |
|---|---|---|
| Handheld plastic | Staining and trapped pulp | Warm soak, small brush, dry fully |
| Handheld stainless | Hinge rust | Hand wash, dry fast, oil if advised |
| Lever-action metal | Screw joints and springs | Partial disassembly, brush, inspect |
| Tabletop crank | Large chute and crank parts | Clean right after use, dry moving parts |
| Electric model | Motor housing and food zones | Follow manual, keep base dry |
For lever models, the screws are often the problem. Pulp collects under the head and hardens. If the manufacturer allows removal, clean the joint and reassemble only when dry.
For crank models, the chute may be larger, but the mechanism can still trap skins. Remove the hopper or tray if possible. Wash food-contact parts separately.
Mistakes That Make a Cherry Pitter Harder to Clean
Most cleaning problems come from a few common habits.
- Leaving the pitter unrinsed after use
- Putting plated metal in the dishwasher
- Soaking metal parts too long
- Using abrasive pads on food-contact surfaces
- Ignoring the spring and hinge
- Storing the pitter while damp
- Losing small parts during disassembly
- Using bleach on stainless steel without checking the label
- Scrubbing rust so hard that the surface pits
- Reassembling parts before they are fully dry
The biggest mistake is waiting. Cherry residue is easy to remove when wet. It becomes much harder once dry.
The second biggest mistake is dishwasher use without checking the label. Many plated metal pitters look sturdy but rust quickly in a machine.
Dry, Store, and Maintain Your Cherry Pitter the Right Way
Cleaning only works if storage follows. A clean pitter stored damp can still rust.
Use this routine.
- Dry every part with a towel.
- Leave the pitter open to air-dry.
- Keep parts separated until fully dry.
- Store in a dry drawer, not a damp tool cup.
- Check moving parts before seasonal use.
For metal pitters, a light coat of food-safe mineral oil can help protect joints. Use only a thin amount. Wipe off any excess.
Before cherry season, inspect the pitter first. Open and close it. Feel for stiffness.
Look for rust, chips, or loose parts. A two-minute check saves a frustrating day of pitting.
When to Keep It, Deep-Clean It, or Replace It
Not every hard-to-clean pitter deserves rescue. Use a simple decision path.
Keep it if:
- The residue is fresh or only lightly dried.
- The metal is stainless and rust-free.
- Parts still align correctly.
- The spring and plunger move smoothly after cleaning.
Deep-clean it if:
- Pulp is stuck but the metal is sound.
- The action is stiff from dried sugar.
- Stains or odors remain but no rust touches food zones.
Replace it if:
- Rust appears on food-contact surfaces.
- Coating is chipped near the pit channel.
- The plunger is bent.
- Small parts are missing.
- Cleaning takes more than 30 minutes often.
If you pit cherries for canning, follow USDA home canning guidance and keep all fruit-contact tools in good condition. Damaged tools can harbor residue that is hard to remove fully.
Easy-Clean Cherry Pitter Features to Compare Before Buying
If cleaning is the main frustration, the next pitter should be chosen for serviceability, not just speed.
As of 2026, many budget pitters still use plated hinges and hidden screws. Those details matter more than color or grip style.
Look for these features.
- Stainless steel food-contact parts
- Removable plunger or pit chamber
- Few screws and simple joints
- Smooth internal surfaces
- No rough casting seams
- Clear dishwasher-safe labeling
- Easy brush access to the chute
- Spring design that does not trap pulp
A simple two-piece pitter may not pit as fast as a heavy lever model. It may still be the better choice if cleaning time matters.
For high-volume pitting, a tabletop model with fewer hidden crevices can be easier to maintain. For occasional use, a small stainless handheld tool may be enough.
Cherry Pitter Cleaning FAQs
Why is my cherry pitter still sticky after washing?
Sticky residue usually means fruit sugar is still trapped. Focus on the plunger, spring, and pit chute. Warm soapy water helps, but a brush does the real work.
If parts are removable, take them apart. Dry each piece before putting the pitter back together.
Can I put a cherry pitter in the dishwasher?
Some models are top-rack dishwasher safe, but many are not. Plated metal can rust, and plastic can stain. Check the manufacturer label first.
If there is no label, hand wash it. A quick hand wash also lets you inspect springs and hinges.
How do I remove rust from a cherry pitter?
Light surface rust on non-food parts may come off with vinegar and a brush. Rust on food-contact parts is more serious. Scrubbing can leave pitted metal that traps bacteria.
If rust returns after cleaning, replace the pitter. Stainless steel models resist rust better.
How do I keep cherry pits from jamming the pitter?
Rinse the pitter before pulp dries. Push each pit through the chute before it jams. Use a detail brush or wooden pick for stuck fragments.
Avoid metal tools that scratch plastic. If pits jam often, the pitter may be too small for large cherries.
When should I replace a hard to clean cherry pitter?
Replace it if rust touches food areas, coating chips, or parts bend. Also replace it if small pieces are missing. A stiff spring can sometimes be cleaned, but cracked plastic cannot.
If cleaning takes more than 30 minutes often, a simpler pitter may save time.
Deep-Cleaning Path for Dried Pulp, Stuck Pits, or Sticky Springs
If pulp has hardened, slow the process down. Don't force the plunger.
Start with warm water and dish soap. Soak the head only, not the whole tool if it has non-removable metal parts. Ten minutes is enough for light residue.
Twenty minutes works for heavy buildup.
Then use this check.
- If the plunger moves, work it under water.
- If a pit blocks the chute, push it out with a wooden skewer.
- If the spring feels gritty, brush around each coil.
- If screw joints feel sticky, open them only if the maker allows it.
Rinse before judging the result. Dried bits often look worse while wet. If the action is still stiff after drying, the issue may be corrosion, not pulp.
Rust, Cherry Stains, Odors, and Mineral Buildup: What to Do
The fix depends on what the surface actually shows.
Rust needs the strictest response. Light orange dust on a hinge may be cleaned. Rust on the plunger tip or pit channel is more serious.
Food-contact metal that pits or flakes should be replaced.
Stains are usually cosmetic. Cherry pigment bonds to plastic. A baking soda paste can fade it.
Scrub gently so the surface does not scratch.
Odors point to trapped organic matter. Check the hinge pin, spring seat, and any recessed seams. A sour smell after washing means residue remains.
White mineral film is common in hard-water areas. A short vinegar soak helps. Use equal parts vinegar and water.
Rinse well and dry fast.
This split matters. Stains can stay. Rust near fruit should not.
Cleaning Path by Cherry Pitter Type
A simple design usually cleans faster than a complex one.
Handheld plastic pitters need stain control. Wash them soon, and keep them out of hot dishwashers if the plastic is thin.
Stainless handheld models need rust prevention. Hand washing is safer. Dry the hinge first because water hides there.
Lever models need joint checks. Pulp collects under screw heads and around the press plate. If the tool can be partly taken apart, clean each piece on a towel.
Crank pitters need chute care. Skins can wrap around the crank or jam the feed. Clean the food zones before residue dries, and keep the motor base dry on electric units.
The if/then rule is simple. If parts come apart easily, clean them separately. If they do not, use a brush and rinse longer.
Mistakes That Make a Cherry Pitter Harder to Clean
Most damage happens after washing, not during pitting.
The worst habit is leaving juice on the tool. Cherry sugar hardens fast. Once it sets, every other step takes longer.
Dishwasher use is the second common problem. Many plated parts look fine before the cycle and speckled after it. Heat and detergent speed corrosion on weak coatings.
Other costly mistakes include:
- Soaking metal overnight
- Scrubbing with abrasive pads
- Reassembling parts while damp
- Losing springs or pins in the sink
- Ignoring small cracks or chips
A small chip can trap food. A damp hinge can rust by the next season. If you notice either, fix the storage routine or replace the tool before canning season.
Dry, Store, and Maintain Your Cherry Pitter the Right Way
Drying is the final cleaning step. It's also the one people skip.
Towel dry every part first. Then leave the pitter open on a rack. Closed storage traps moisture in the hinge and spring.
For long-term storage, do this:
- Check the plunger for smooth movement.
- Look at the hinge, screws, and pit slot.
- Wipe metal parts with a dry cloth.
- Add a thin coat of food-safe mineral oil if the maker allows it.
- Store the tool open, not pressed shut.
Our research shows most repeat rust starts at the hinge. Before the next cherry season, inspect it again. If it resists opening, don't force it.
Soak the head briefly and brush the affected zone.
Good storage turns a five-minute cleanup into a seasonal reset. It also keeps the tool safer for food contact.
When to Keep It, Deep-Clean It, or Replace It
Keep it if the metal is smooth and rust-free. Deep-clean stiff parts caused by dried sugar. Replace pitted, flaking, or bent food-contact parts.
Easy-Clean Cherry Pitter Features to Compare Before Buying
Choose stainless parts, open hinges, and removable plungers. Avoid rough seams and hidden screws. Simple designs usually rinse faster.
Quick Seasonal Reset Checklist
Before cherry season, open the tool, inspect the hinge, and brush the chute. Wash, dry fully, then apply a thin food-safe oil if allowed.
Cherry Pitter Cleaning FAQs
Is rust always a dealbreaker?
Rust on fruit-contact surfaces usually is. Light hinge rust may be cleaned.
Can cherry stains stay?
Yes. Plastic stains can remain if the surface is clean and smooth.
Final Decision Guide
If cleaning takes more than 30 minutes often, switch designs. Prioritize serviceability over speed.