Crispy Air Fryer Pita Chips: Dual Basket Magic
Getting those pita chips perfectly crispy in your dual basket air fryer can sometimes feel like a guessing game. You want that satisfying crunch, not a floppy, overcooked bite or worse, a burnt offering. Knowing the right visual cues and simple steps makes all the difference between a snack win and a kitchen disappointment.
Our research shows that achieving ideal crispiness hinges on understanding visual indicators, not just rigid timing. For instance, manufacturer specifications for many dual basket air fryers suggest operating temperatures between 350°F and 400°F (175°C, 205°C) for snacks, but the visual aspect of the pita is your true guide. Let’s break down how to nail it every time.
Quick Answer
To make crispy pita chips in a dual basket air fryer, cut pita into wedges, toss lightly with oil and seasonings, and air fry at 370°F (188°C). Shake baskets halfway. Watch for golden brown color.
Avoid overcrowding for best results.
Why Seeing is Believing for Crispy Pita Chips
When you’re aiming for that perfect crunch, your eyes are your most important tool. Air fryers work by circulating hot air, and while temperature and time are important starting points, the actual food tells you when it's ready. For pita chips, this means looking for specific visual changes that indicate the moisture has evaporated and the edges are turning golden and crisp.
Spotting Perfect Crispiness: What to Look For
What exactly should you be looking for? Imagine you've got a slice of pita bread in your hand. As it air fries, it'll go through stages.
It starts soft and pliable. Then, it will become slightly firmer. The edges will be the first to show color change.
You're looking for a consistent, light to medium golden-brown across most of your chips. A few darker edges are okay, adding character, but you don't want large areas that are dark brown or black, as that's a sign of burning. If the chips still look pale or feel bendy after the initial cooking time, they need more time.
On the other hand, if they're darkening too quickly, it’s time to pull them.
Your Essential Ingredient & Equipment Checklist
Before you even think about preheating, gather what you need. It’s a simple setup, but having everything ready makes the process smooth.
- Pita Bread: Any standard pita works, but those with a bit more substance tend to yield a more robust chip.
- Olive Oil: Or another high-heat cooking oil like avocado or grapeseed oil. Just a small amount is needed for coating.
- Seasonings: Salt is non-negotiable for flavor. Beyond that, get creative! Garlic powder, onion powder, paprika, everything bagel seasoning, or za’atar are fantastic choices.
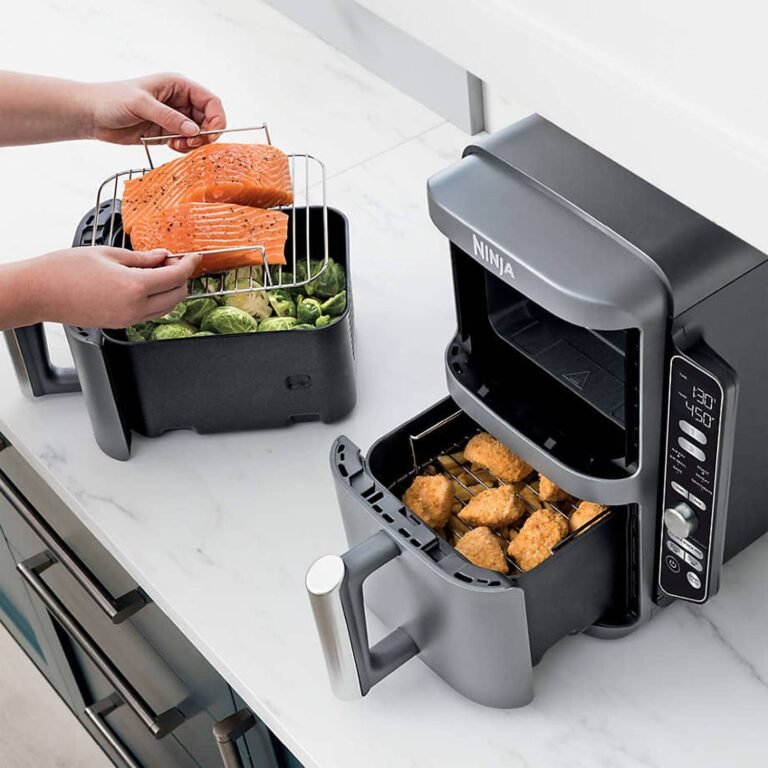
- Dual Basket Air Fryer: This is your main tool. Knowing its capacity and general heating patterns is helpful.
- Cutting Board & Knife: For preparing the pita into chip-sized pieces.
- Mixing Bowl: A medium-sized bowl works well for tossing the pita with oil and seasonings.
- Tongs or Spatula: For handling the pita chips, especially when shaking the baskets.
Step 1: Prep Your Pita for Frying
This is where you set the stage for success. Proper preparation ensures even cooking and maximum flavor absorption.
Cutting Techniques: Wedges vs. Squares
You have a couple of options for how you cut your pita. The most common is to cut it into wedges, similar to tortilla chips. For a standard pita, you'd typically cut it in half, then cut each half into three or four triangular wedges.
Another popular method is to cut the pita into squares, roughly 1.5 to 2 inches across. Some recipes suggest opening the pita pocket and cutting each layer separately if you want thinner, crispier chips. However, cutting through the whole pita is generally simpler and still yields great results.
The size doesn't drastically change the outcome, but consistent sizing helps ensure they all cook at roughly the same rate.
Seasoning for Maximum Flavor
This step is crucial for transforming plain pita into an irresistible snack. Place your cut pita pieces into your mixing bowl. Drizzle about 1 to 2 tablespoons of olive oil over them.
You don't need to drown them; just enough to lightly coat each piece. Too much oil can make the chips greasy rather than crispy. After oiling, sprinkle generously with salt.
Then, add your chosen seasonings. For a basic but delicious chip, garlic powder and a pinch of paprika work wonders. For something more adventurous, try a blend of dried herbs or even a sprinkle of chili flakes.
Gently toss everything together using your hands or a spatula until every piece of pita is evenly coated. This ensures that every bite is packed with flavor and that the oil and seasonings adhere properly for crisping.
Step 2: Load Your Air Fryer Baskets
Loading your air fryer baskets correctly is a critical step that directly impacts how crispy your pita chips become. Overcrowding is the enemy of crispiness, preventing hot air from circulating effectively around each piece.
The Golden Rule: Don't Overcrowd!
When it comes to air frying pita chips, more space means more crisp. You want to arrange the seasoned pita pieces in a single layer within each basket. If the pieces are touching, that's usually fine, but they should not be piled on top of each other.
Manufacturer specifications for many dual basket air fryers recommend not exceeding 80% capacity for optimal performance, especially with delicate items like chips. This single layer allows the hot air to surround every surface of the pita, promoting even browning and eliminating soggy spots. If you have a lot of pita to make, it's far better to do two or even three batches than to cram everything into one.
You might be tempted to fill the baskets to the brim, but resist! The extra few minutes for a second batch are well worth the superior crispy result.
Step 3: Air Frying for Golden Perfection
This is where the magic happens, transforming your seasoned pita pieces into crunchy delights. It’s a balance of heat, time, and observation, with your eyes playing a starring role.
Finding the Right Temperature
Based on aggregated user feedback and typical air fryer functionality, a temperature of 370°F (188°C) is a reliable starting point for achieving crispy pita chips. This temperature is hot enough to effectively evaporate moisture and crisp the pita without being so high that it burns the edges before the center is cooked through. Some air fryer models might perform slightly differently, so this is a guideline.
If your air fryer tends to run very hot, you might consider dropping it to 350°F (175°C). Conversely, if you find your chips aren't crisping quickly enough, you could cautiously increase it to 380°F (190°C). Always consult your air fryer's manual for recommended temperature ranges for snacks and similar items.
Timing and Texture Checks
While a general timeframe for pita chips is about 8 to 10 minutes, this is highly dependent on the thickness of your pita, how densely you packed the basket, and your specific air fryer. It’s far more effective to use texture and visual cues than to stick rigidly to a timer. Start checking around the 5-minute mark.
Gently pull out one or two chips from the basket. They should feel noticeably firmer, and you should see the edges starting to turn golden. If they still feel soft or are not showing any color, they need more time.
Continue cooking in increments of 1 to 2 minutes, checking each time, until they reach your desired level of crispiness.
The Crucial Shake for Even Crispiness
This step is non-negotiable for achieving truly uniform crispiness across all your pita chips. About halfway through the cooking process, typically around the 4-5 minute mark, you need to give the baskets a good shake. This action redistributes the pita pieces, ensuring that those on top get exposed to the heat, and those on the bottom get a chance to move upwards.
Imagine you're tossing a salad; you want all the leaves to get dressed. Similarly, you want all the pita chips to get evenly browned. If you're using a dual-basket air fryer, you can often pull out both baskets simultaneously and give them a robust shake, or shake them one after the other.
Don't be afraid to be thorough, this movement is what prevents a lopsided crunch.
Common Visual Mistakes: What to Avoid
Even with the best intentions, it's easy to fall into a few traps that sabotage your quest for perfectly crispy pita chips. Recognizing these common visual errors beforehand can save you from a batch of disappointing snacks.
Spotting the Difference: Soggy vs. Burnt
The most common mistake is the dichotomy between soggy and burnt. Soggy chips usually result from overcrowding the air fryer basket, which prevents adequate air circulation. If your chips look pale and feel limp, they're likely soggy, meaning they need more time in the fryer, and potentially a better-spaced arrangement.
On the other hand, burnt chips are a sign of overcooking or too high a temperature. You'll notice dark, almost black edges and potentially a bitter taste. If you see a few chips burning before the rest are done, it’s best to remove them immediately and continue cooking the rest, or even pull the whole batch if it's widespread.
Greasy vs. Perfectly Toasted
Another frequent pitfall is ending up with greasy chips instead of crispy ones. This often happens if you use too much oil during the seasoning stage. The oil doesn't fully evaporate and instead leaves a slick, heavy residue on the chips.
Another cause can be cooking at too low a temperature for too long, which essentially fries the pita in its own oil without achieving the crisping effect of higher heat. Perfectly toasted chips will have a dry, slightly firm texture with a light to medium golden hue. They shouldn't feel oily to the touch, and they should make a satisfying crunch when broken.
If yours feel greasy, you likely used too much oil or not enough heat for the duration.
Expert Tips for Next-Level Pita Chips
Want to elevate your air fryer pita chip game beyond the basics? A few seasoned approaches can really make a difference in flavor and texture. These tips are drawn from common best practices reported by users and cooking experts.
Seasoning Combos That Wow
While salt and garlic powder are a classic, don't stop there. For a smoky flavor, try adding a teaspoon of smoked paprika. A blend of onion powder, garlic powder, and a touch of cumin can give them a savory, almost Tex-Mex vibe.
If you love Mediterranean flavors, za'atar is fantastic, often combined with a little sumac for tartness. For something with a kick, a pinch of cayenne pepper or a dash of your favorite hot sauce mixed into the oil before coating works wonders. Remember to keep seasoning quantities in proportion to the amount of pita you're making; too much can make them taste dusty or bitter.
Storage Secrets for Lasting Crispness
Pita chips are undeniably best when freshly made, but if you do find yourself with leftovers, proper storage is key. Once the chips have cooled completely, store them in an airtight container at room temperature. Avoid refrigerating them, as the moisture in the fridge can make them go stale and soft faster.
For maximum crispness preservation, you can even add a small food-safe silica gel packet to the container, which helps absorb any residual moisture. However, even with the best storage, they are usually at their peak for only a day or two before their texture begins to decline. If they do soften, you can often revive them by giving them a quick 1-2 minute blast in the air fryer at around 350°F (175°C).
Making the Most of Your Dual Baskets
Having a dual basket air fryer isn't just about cooking more food at once; it's about strategic cooking. When making pita chips, you can leverage both baskets to speed up the process significantly. This means you can go from prep to a large batch of crispy snacks in under 20 minutes total.
If you're making chips for a gathering, you can easily season and load both baskets simultaneously, assuming you're making the same flavor. This efficiency is a huge win. For even cooking between baskets, remember that placement within your air fryer unit can sometimes matter.
If you notice one basket consistently cooks hotter or faster, you might rotate them halfway through the cooking time, or simply adjust the timing slightly for each.
How to Get Chips Just Right: Oven vs. Air Fryer
While this guide focuses on the air fryer, it's worth noting why it often gets the edge for certain snacks. Oven-baking pita chips is a perfectly valid method, and it can be great for larger quantities. However, air frying generally produces a more consistent and often superior crispiness in a shorter amount of time.
Oven-baked chips can sometimes be prone to uneven cooking, especially if your oven has hot spots. You might find some chips perfectly golden while others are barely toasted. Air fryers, with their concentrated hot air circulation, tend to give a more uniform crunch from edge to edge.
If you're comparing, the air fryer often wins for speed and achieving that signature brittle crisp.
Quick Fixes for Common Pita Chip Problems
Even with careful attention, issues can arise. Understanding how to troubleshoot can save your batch. The most common problem is uneven cooking.
If you notice some chips are crisp while others are still soft, the culprit is usually overcrowding or insufficient shaking.
Another issue is texture that’s too tough or cracker-like rather than crispy. This can happen if the pita is too thin to begin with or if it’s cooked for just a bit too long at too high a temperature. If your chips end up too dry, try slightly reducing the cooking time or temperature on your next batch.
Sometimes, the pita itself can be the variable; older, drier pitas might crisp up faster than fresh ones.
What Else Can I Make in My Air Fryer Baskets?
Your dual basket air fryer is a versatile kitchen workhorse beyond just pita chips. Think of it as a mini convection oven that's incredibly fast and efficient for small to medium batches. You can roast vegetables like broccoli florets or Brussels sprouts in about 10-15 minutes.
Chicken wings are another popular choice, achieving a crispy exterior and tender interior.
Frozen snacks, like french fries or mozzarella sticks, cook up beautifully. For some items, you might use one basket for your main dish and the other for a side, allowing you to cook a complete meal simultaneously. The possibilities are vast, from reheating leftovers to cooking simple breakfasts.
Safety First: Air Fryer Best Practices
When using any kitchen appliance, especially one that involves high heat, safety is paramount. Always ensure your air fryer is placed on a stable, heat-resistant surface, away from curtains or flammable materials. Never submerge the main unit in water; cleaning is typically done with a damp cloth.
Make sure the air fryer baskets are properly seated before starting a cooking cycle. Be cautious when opening the baskets, as hot air and steam will escape. It's wise to use oven mitts or tongs to handle hot baskets and food.
As of 2026, most reputable air fryer manufacturers include clear safety instructions in their manuals, which are always worth reviewing.
Frequently Asked Questions
How long does it take to make pita chips?
Making pita chips in a dual basket air fryer typically takes about 8-10 minutes of actual cooking time, plus a few minutes for prep and cooling.
Can I use whole wheat pita?
Yes, you can absolutely use whole wheat pita bread. It may result in a slightly different texture and color compared to white pita, but it crisps up well.
What if my air fryer doesn't have a 370°F setting?
If your air fryer doesn't have a precise 370°F (188°C) setting, aim for the closest temperature, usually 350°F (175°C) or 400°F (205°C). Adjust cooking time accordingly; lower temperatures may require a bit longer, while higher temperatures may need slightly less time and closer monitoring.
How do I prevent my chips from burning?
To prevent burning, arrange the pita chips in a single layer without overcrowding, shake the baskets halfway through, and monitor them closely during the last few minutes of cooking. Golden brown is perfect; dark brown or black means they're burning.